Trick Tips and Equipment for Effective Plastering in Your Home Improvement Undertakings
Accomplishing a remarkable plaster surface in your house renovation jobs calls for a blend of the right devices and tried and tested techniques. Necessary implements such as the hawk and trowel are important for reliable application, while appropriate surface prep work lays the structure for success. Additionally, understanding the subtleties of blending plaster and using it in slim layers can significantly influence the final outcome. As we check out these basic facets, it comes to be noticeable that staying clear of common mistakes can raise your plastering skills-- ensuring your next project not just fulfills but surpasses expectations.
Crucial Smudging Devices
A plasterer's toolkit is basic to achieving a long lasting and smooth coating on ceilings and walls. The important tools encompass a range of carries out created to assist in the gluing procedure effectively and efficiently. Key parts consist of a hawk, which is a flat, square tool used to hold the plaster while using it to surface areas. This tool allows for very easy transportation and application of the product.
Additionally, a blending bucket is required for preparing plaster, making sure the best uniformity before application (Plastering). Together, these vital plastering tools allow both specialists and DIY fanatics to achieve high-grade results in their gluing projects.
Surface Area Preparation Techniques
Appropriately preparing the surface prior to smudging is critical for making certain adhesion and attaining a flawless surface. The very first step includes cleansing the surface to eliminate any kind of dust, oil, or old paint that might prevent the plaster's capacity to bond effectively. A detailed wash with a suitable cleaning solution is recommended, complied with by rinsing and allowing the surface to completely dry totally.
Next, examine the surface for any imperfections or splits. These need to be loaded with an ideal filler compound and enabled to treat according to the producer's instructions. For permeable surface areas, applying a guide is vital to produce a consistent texture and boost bond.
In addition, it is essential to make certain that the surface is stable and structurally audio. Any kind of loose products, such as flaking paint or damaged drywall, should be repaired or eliminated. Consider utilizing a scratch coat to enhance grasp. if working with masonry surfaces.
Combining Plaster Like a Pro

Making use of a tidy mixing container, put the water first, after that progressively add the plaster powder while mixing continuously - Plastering. This method assists to prevent clumping and makes certain an even circulation of materials. A mechanical mixer can be advantageous, supplying regular results and conserving time. Purpose for a velvety, lump-free uniformity that permits simple spreading however is thick sufficient to hold its form without running.
When blended, permit the plaster to relax for a few mins to enable the gypsum crystals to moisturize fully. This pause boosts workability and reduces the danger of fracturing throughout application. By complying with these actions, you can blend plaster like a pro, setting the foundation for a successful gluing task in your house improvement ventures.
Application Approaches for Smooth Finishes
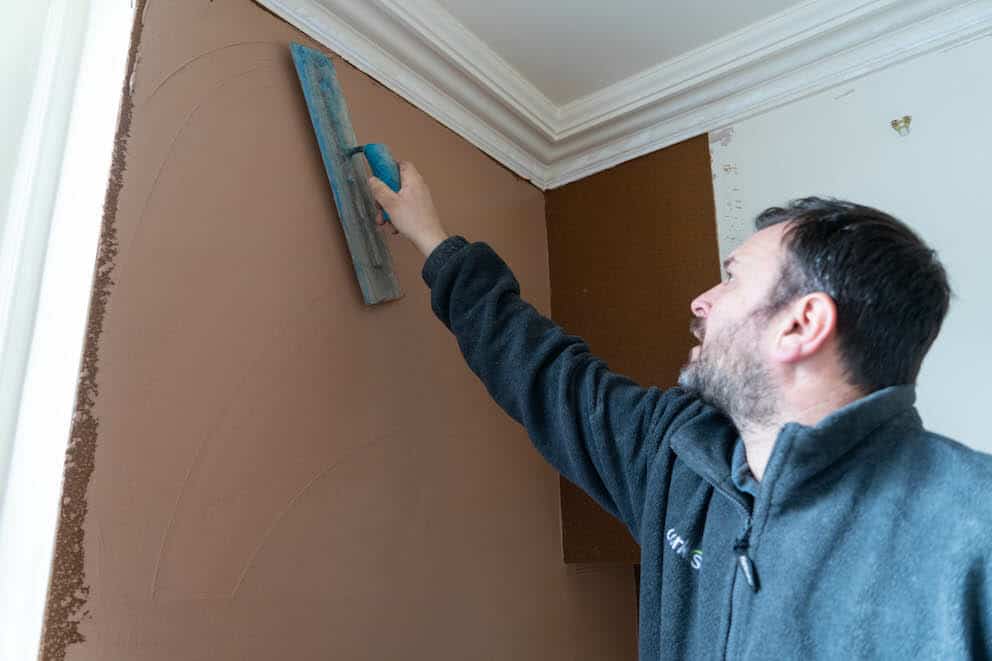
With the plaster mix prepared to the excellent uniformity, the following action involves selecting appropriate application methods to accomplish a smooth coating. The option of application devices substantially influences the final look of the plastered surface area. For optimum Home Page outcomes, a stainless steel trowel is frequently suggested. This device permits a penalty, also circulation of plaster throughout the surface while decreasing trowel marks - Plastering.
Begin by applying a generous quantity of plaster to the surface area using the trowel, ensuring it adheres well. Use a methodical approach, working from the lower upward. Once the preliminary layer is applied, use a sweeping activity to smooth the surface, applying also pressure. In locations that need more thorough interest, think about making use of a float, which can aid get rid of any blemishes and develop a consistent texture.
For the final touches, a wet sponge can be utilized to refine the surface area better. Lightly mist the plaster with water and gently rub the surface area to accomplish a sleek effect. Constantly bear in mind to function in tiny areas to preserve control over the application process, ensuring a smooth, professional surface throughout your plastering task.
Typical Mistakes to Prevent
When starting a gluing project, preventing usual mistakes is crucial for attaining a perfect finish. Among one of the most common mistakes is overlooking surface preparation. Falling short to official website tidy and fix the substratum can lead to bad bond and unequal surface areas. Make sure that all dust, grease, and loosened materials are gotten rid of prior to applying plaster.
One more typical blunder is applying plaster as well heavily. Thick layers can crack as they dry out, endangering the honesty of the surface. Rather, select multiple slim layers, enabling each coat to dry entirely prior to applying the next.
In addition, poor mixing strategies can result in inconsistent structure and workability. Constantly comply with the maker's guidelines for blending ratios and thoroughly blend the plaster to achieve a consistent uniformity.
Timing likewise plays a critical function; plaster must be applied while the substrate is moist to boost adhesion. Finally, prevent making use of incorrect tools. High-quality trowels and floats can make a substantial difference in attaining a smooth finish. By guiding clear of these common risks, you can enhance the quality and long life of your plastering job, leading to a more specialist lead to your home improvement ventures.
Verdict
Efficient smudging calls for a detailed understanding of crucial tools and techniques. By using correct equipment, making certain precise surface area prep work, and adhering to advised blending proportions, optimal outcomes can be achieved. Using appropriate application approaches additionally boosts the finish, while understanding of common mistakes can stop troubles. Proficiency Going Here of these aspects not only adds to the visual charm of a space yet additionally guarantees resilience and durability in plastering projects, making them indispensable to successful home renovation endeavors.
A float is another vital device, which helps in leveling the plaster and attaining a consistent surface.

By adhering to these steps, you can mix plaster like a professional, setting the foundation for a successful smudging job in your home enhancement ventures.
Lightly haze the plaster with water and carefully scrub the surface area to accomplish a refined effect.
Comments on “Necessary Tools and Strategies for Expert Plastering at Home”